

Gradual update of all applications using WinGet and custom Azure ring groups


Today I will show you how to make the process of updating apps in your company as easy as possible 😎.
We will use:
WinGet to update the applications
- Winget-AutoUpdate tool to be more specific
Intune to distribute Winget-AutoUpdate tool
Custom Azure "ring" groups to make the update gradual
- by assigning the Winget-AutoUpdate package with different update settings to these "ring" groups
Azure Automation to keep our "ring" group members up to date
Benefits
Free (or with like 0,5 USD/month)
This can be set&forget solution (but check the caveats section) that will update every supported application
You can use whitelist or blacklist approach for updating the apps (a.k.a. not all apps have to be updated)
The update of applications will be carried out in waves (controlled via ring groups). This way, you will have the opportunity to stop the update process or exclude problematic apps if any problems arise in the testing ring group.
Caveats
Only installed software that WinGet "knows", can be updated (to get known packages, run
winget listcommand on your command)You need to trust WinGet packages (who are the WinGet maintainers?). At least to have a hassle-free solution. Another option would be to have some automated check for the WinGet package manifest files to see whether installers are downloading from the correct URLs
- Unfortunately, there is nothing like "verified" publishers in the WinGet still
Not all WinGet packages are top-notch quality. It happened to me that some installer wasn't running silently. Instead, GUI was shown, which could be confusing for your users and can lead to not updating the apps. Also in some cases, it can happen that the old version is not uninstalled automatically
Because set&forget ideology, there is no option to control the version apps should be updated to. That's the main reason for using "ring" groups. To be able to react to potential issues before main groups of users get the update.
Requirements
Be an Intune administrator
- to be able to create and deploy packages
Be an Azure administrator
to be able to create groups and Azure Automation Runbook and to assign the Graph API permissions
- Azure Automation can be replaced by on-premises Scheduled task
Windows clients managed through the Intune
Be OK to use the community Winget-AutoUpdate tool
- can be done without it, but this offers several nice features like Mods, etc and you can easily check its source code to make sure it is clean
Steps to make this solution work
Set up Azure "ring" groups and Automation to manage them
Follow the steps mentioned in the post How to create your own autopatch-like "ring" groups in Azure using Azure Automation and PowerShell to create all required Azure groups ("root" and "ring") plus the automation (that will manage the group members based on the given criteria).
For our particular use case check details below about what groups you should create.
Root group
Create Azure group with just a few devices for testing purposes only.
When you test this solution enough, fill this group with rest of your client devices.
Ring groups
A "ring" groups will be used for assignment when deploying the Winget-AutoUpdate updating tool package.
Every package will deploy the tool with a different update frequency configuration.
This is how we make the update process gradual 😎!
There are several update frequency settings available right now (Daily (Default), BiDaily, Weekly, BiWeekly, Monthly or Never (check the UpdatesInterval parameter for more details)
Hence if for example, you want to test the updates in four waves (daily, weekly, biweekly, monthly), create four Azure "ring" groups.

It is a good idea to specify the update frequency in the group name, to make it easier to identify the group purpose later (TIP: the group description will be automatically set using our automation)
Create the groups as security and with manually assigned members (don't add any members now!).
Make a note of each created group and its ID. We will need this when setting up the Azure automation.
Create & deploy Intune Win32App packages for deploying the Winget-AutoUpdate tool
One last step in our journey is to create Intune apps for deploying the Winget-AutoUpdate tool and assign these apps to our "ring" groups.
One Intune app should be created for every update ring. The only thing these apps will differ is the set update frequency.
Thanks to the Winget-AutoUpdate tool parameter UpdatesInterval we can have only one physical Win32App package and just use different Intune installation commands 😎.
Create the Win32App package
Download the newest stable version of the Winget-AutoUpdate tool (WAU.zip).
Unzip
WAU.zipto the new folderWinget-AutoUpdate_AllButExcludedMove file
excluded_apps.txtout to a different folder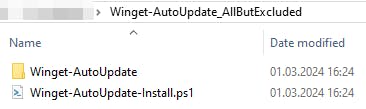
Create
Winget-AutoUpdate_AllButExcluded.intunewinpackage from theWinget-AutoUpdate_AllButExcludedfolder (how?)
Create Intune app
Create new
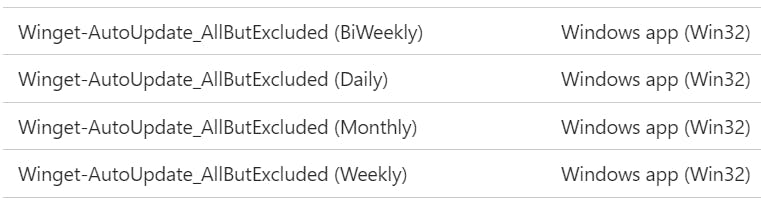
Windows app (win32)and as a package useWinget-AutoUpdate_AllButExcluded.intunewincreated in the previous stepPackage name should contain used update frequency (for example
Winget-AutoUpdate_AllButExcluded (BiWeekly)) for easy differentiationThe install command will be:
"%systemroot%\sysnative\WindowsPowerShell\v1.0\powershell.exe" -noprofile -executionpolicy bypass -file "Winget-AutoUpdate-Install.ps1" -Silent -DoNotUpdate -DisableWAUAutoUpdate -InstallUserContext -NotificationLevel <NotificationLevel> -UpdatesInterval <UpdatesInterval> -ListPath <PathToYourBlackListFile><NotificationLevel>replace byFull,SuccessorNone. At least from the start when there will be a lot of apps updated it is a good idea to selectNoneto minimize the users distraction<UpdatesInterval>replace byDaily,BiDaily,Weekly,BiWeeklyorMonthlybased on the "ring" package you are creating right now<PathToYourBlackListFile>replace by URL where theexcluded_apps.txtfile is hosted (check Tips & tricks section for more details)- 💡There are other useful parameters like
ModsPath
The Uninstall command will be
"%systemroot%\sysnative\WindowsPowerShell\v1.0\powershell.exe" -noprofile -executionpolicy bypass -file "C:\ProgramData\Winget-AutoUpdate\WAU-Uninstall.ps1"The detection script will be similar to this
      # required values
      $RequiredUpdatesInterval = "<replace>" # "Daily", "BiDaily", "Weekly", "BiWeekly", "Monthly", "Never"
      $RequiredDisplayVersion = "<replace>" # 1.19.1
      $RequiredNotificationLevel = "<replace>" # "Full", "SuccessOnly", "None"

      Start-Sleep 30

      $ErrorActionPreference = "Stop"

      #region configured values
      $WAURegPath = "HKLM:\SOFTWARE\Microsoft\Windows\CurrentVersion\Uninstall\Winget-AutoUpdate\"

      try {
          $InstallLocation = Get-ItemPropertyValue -Path $WAURegPath -Name "InstallLocation"
          $UpdatesInterval = Get-ItemPropertyValue -Path $WAURegPath -Name "WAU_UpdatesInterval"
          $DisplayVersion = Get-ItemPropertyValue -Path $WAURegPath -Name "DisplayVersion"
          $NotificationLevel = Get-ItemPropertyValue -Path $WAURegPath -Name "WAU_NotificationLevel"
      } catch {
          throw "WAU not installed"
      }

      try {
          $UseWhiteList = Get-ItemPropertyValue -Path $WAURegPath -Name "WAU_UseWhiteList"
      } catch {
          $UseWhiteList = $false
      }
      #endregion configured values

      if (($UpdatesInterval -eq $RequiredUpdatesInterval) -and ($NotificationLevel -eq $RequiredNotificationLevel) -and !$UseWhiteList -and [version]$DisplayVersion -ge [version]$RequiredDisplayVersion -and $InstallLocation -and (Test-Path $InstallLocation) -and (Get-ScheduledTask -TaskName "Winget-AutoUpdate") -and (Get-ScheduledTask -TaskName "Winget-AutoUpdate-Notify")) {
          return "WAU is installed"
      } else {
          throw "WAU not installed"
      }
Don't forget to replace the following variables to match your setup
$RequiredUpdatesInterval,$RequiredDisplayVersion,$RequiredNotificationLevel!
At the end of the day, you should have something similar in your Intune app list
Deploy Intune app
Now when all necessary Intune apps are created, assign each of them as required to the corresponding Azure "ring" group.
In my case app Winget-AutoUpdate_AllButExcluded (BiWeekly) is assigned to the group _testo_ring_biweekly, Winget-AutoUpdate_AllButExcluded (Monthly) app is assigned to the group _testo_ring_monthly etc.
Summary
If you successfully finished all the previous steps, you should now have a working solution for updating your company clients apps.
Created Azure Automation Runbook will rebalance your clients across the Azure ring groups and based on this, WinGet-AutoUpdate Intune package will be installed on the group members and will update the client apps according the schedule set in the package installation command.
Tips & tricks
Saving app exclude list to the cloud
Winget-AutoUpdate has one super cool feature and that is the option to place the exclude list (excluded_apps.txt) online (check the ListPath parameter). This way whenever an update is being run, the exclude list will be downloaded hence the changes made in this list are immediately applied. This is very useful in case, we have a problem with some app update. Just exclude the app by adding its WinGet ID to this list and remove it once again when a new, fixed version is available in the WinGet repository.
If you want to save your excluded_apps.txt to the Azure DevOps public repository this is how you can find the URL for ListPath parameter:
Place the
excluded_apps.txtfile to your public DevOps repositoryIn your browser open the folder (
Repos\Files\<Repository>\...) where you store the file (URL has to target folder, not directly theexcluded_apps.txt!)Open browser Developer tools (F12)
Search for "dev.azure.com<nameOfYourOrganization>"
URL you are looking for should be in this format
https://dev.azure.com/<nameOfYourOrganization>/<projectId>/_apis/git/repositories/<repositoryId>/Items?path=/(in case the file is in the repository root)Use found URL for
ListPathparameter
What should I do when the updated app version causes troubles
If you are hosting excluded_apps.txt "in the cloud" (public git repository, azure blob storage, etc), just add the Winget ID of this specific app to this file.
Winget-AutoUpdate tool will automatically skip this app when invoked next time.
When the new "fixed" app version is released. Remove the ID from the
excluded_apps.txtfile.
According to the affected clients. It depends on the situation, your environment and solution can vary. But in general, you need to remove the app and install the last working one.
Using wildcards in the exclusion list
In your excluded_apps.txt you can use wildcard * to exclude all matching apps.
This feature is available since the 1.20.0 version of the Winget-AutoUpdate tool.
Debugging the app updates
Check the logs https://github.com/Romanitho/Winget-AutoUpdate?tab=readme-ov-file#log-location